一.nginx概述 nginx是一款开源的http,web应用服务器,其功能模块化,高性能高可靠。
特性:
Nginx特点是占有内存 少,并发 能力强,事实上nginx的并发能力确实在同类型的网页服务器中表现较好。
Nginx由内核和模块组成,其中,内核的设计非常微小和简洁,完成的工作也非常简单,仅仅通过查找配置文件将客户端请求映射到一个location block(location是Nginx配置中的一个指令,用于URL匹配),而在这个location中所配置的每个指令将会启动不同的模块去完成相应的工作。
Nginx相对于Apache优点:
高并发响应性能非常好,官方Nginx处理静态文件并发5w/s 反向代理性能非常强。(可用于负载均衡) 内存和cpu占用率低。(为Apache的1/5-1/10) 对后端服务有健康检查功能。 支持PHP cgi方式和fastcgi方式。 配置代码简洁且容易上手。
nginx采用epoll模型(异步非阻塞),而apache采用select模型。
1
2
3
4
5
6
7
8
9
10
11
12
13
14
15
16
select 和epoll 模型的区别select :当用户发起一次请求,select 模型就会进行一次遍历扫描,从而导致性能低下epoll :当用户发起请求,epoll 模型会直接进行处理,效率高效,并无连接限制。select 和epoll 对比select 1024 。如果要处理超过1024 个连接数,则需要修改FD_SETSIZE宏,并重新编译 。epoll
nginx应用场景: 静态服务:
二.nginx安装 http://nginx.org/en/download.html #nginx官网地址
nginx一般有两种安装方式:
源码安装和rpm安装:
rpm安装:
epel源:版本低,功能少
yum安装 官方源: 1 sudo yum install yum-utils
To set up the yum repository, create the file named /etc/yum.repos.d/nginx.repo with the following contents:
1
2
3
4
5
6
7
8
9
10
11
12
13
14
15
[nginx-stable] name =nginx stable repobaseurl =http://nginx.org/packages/centos/$releasever /$basearch /gpgcheck =1 enabled =1 gpgkey =https://nginx.org/keys/nginx_signing.keymodule_hotfixes =true [nginx-mainline] name =nginx mainline repobaseurl =http://nginx.org/packages/mainline/centos/$releasever /$basearch /gpgcheck =1 enabled =0 gpgkey =https://nginx.org/keys/nginx_signing.keymodule_hotfixes =true
By default, the repository for stable nginx packages is used. If you would like to use mainline nginx packages, run the following command:
To install nginx, run the following command:
When prompted to accept the GPG key, verify that the fingerprint matches 573B FD6B 3D8F BC64 1079 A6AB ABF5 BD82 7BD9 BF62, and if so, accept it.
上面的为最新包的安装,下面的为稳定版的安装,文档内容截自官方文档,如为其他系统则参考官方文档 :http://nginx.org/en/linux_packages.html#RHEL-CentOS
epel源: 1 2 3 4 5 yum -y install epel-release.noarch ```install nginx
源码安装: 1 2 3 4 5 6 7 8 9 10 11 12 13 14 wget http://nginx.org/download/nginx-1.19.6.tar.gz /sbin/nologin -M nginx cd nginx-1.19.6/./configure --prefix=/usr/local/nginx --user=nginx --group=nginx --with-file-aio --with-ipv6 --with-http_ssl_module --with-http_v2_module --with-http_realip_module --with-http_addition_module --with-http_xslt_module=dynamic --with-http_image_filter_module=dynamic --with-http_sub_module --with-http_dav_module --with-http_flv_module --with-http_mp4_module --with-http_gunzip_module --with-http_gzip_static_module --with-http_random_index_module --with-http_secure_link_module --with-http_degradation_module --with-http_slice_module --with-http_stub_status_module --with-http_perl_module=dynamic --with-http_auth_request_module --with-mail=dynamic --with-mail_ssl_module --with-pcre --with-pcre-jit --with-stream=dynamic --with-stream_ssl_module --with-debug /usr/local/nginx/
源码安装的好处在于其所有nginx相关文件都可以放在一起,方便数据迁移。相比于yum麻烦的是:
源码安装完成以后linux环境变量没有nginx路径,需要配置(才能直接在命令行找到命令)
systemd不会自动生成nginx启动文件(无法通过systemctl直接启动关闭nginx)
所以这两个都需要手动进行生成
systemd: 1 2 3 4 5 6 7 8 9 10 11 12 13 14 15 16 17 18 19 cat > /etc/ systemd/system/ nginx.service << EOF/usr/ local/nginx/ logs/nginx.pid/usr/ bin/rm -f $PIDFile /usr/ local/nginx/ sbin/nginx -t/usr/ local/nginx/ sbin/nginx/bin/ kill -s HUP PIDFileExecStartPre=/usr/ local/nginx/ sbin/nginx−tExecStart=/u sr/local/ nginx/sbin/ nginxExecReload=/bin/ kill−sHUP$MAINPID 5
将systemd文件写入以后可以使用systemctl start nginx测试一下
加入环境变量 1 2 3 4 5 cat > /etc/ profile.d/nginx.sh << EOF/usr/ local/nginx/ sbin:$PATH /etc/ profile.d/nginx.sh
三. nginx配置文件
nginx配置文件:
默认使用rpm包的nginx相关配置文件如上,如果是源码安装的如果没特别指定路径一般在编译安装prefix指定的nginx根目录下,也有些文件夹不会自动生成可以手动生成。比较重要的配置文件有
conf/nginx.conf:这个是nginx的根配置文件
html站点目录:这个是网站文件夹的路径(也可以不用默认的路径)
nginx.logs:nginx日志生成目录
nginx.conf nginx配置文件格式一般为: 1 2 3 4 5 6 7 8 9 10 11 12 13 14 15 16 17 18 19 20 ... ... ... ...
完整配置文件以及常用到的一些配置: 1 2 3 4 5 6 7 8 9 10 11 12 13 14 15 16 17 18 19 20 21 22 23 24 25 26 27 28 29 30 31 32 33 34 35 36 37 38 39 40 41 42 43 44 45 46 47 48 49 50 51 52 53 54 55 56 57 58 59 60 61 62 63 64 65 66 67 68 69 70 71 72 73 74 75 76 77 78 79 80 81 82 83 84 85 86 87 88 89 90 91 92 93 94 95 96 97 98 99 100 101 102 103 104 105 106 107 108 109 110 111 112 113 114 115 116 117 118 119 120 user www www;worker_processes 8 ;worker_cpu_affinity 00000001 00000010 00000100 00001000 00010000 00100000 01000000 10000000 ;worker_rlimit_nofile 102400 ;error_log /usr/local/nginx/logs/error.log; pid /usr/local/nginx/nginx.pid;worker_rlimit_nofile 65535 ;events {use epoll ; worker_connections 102400 ; multi_accept on ; http {include mime.types;default_type application/octet-stream;access_log /usr/local/nginx/log/nginx/access.log;sendfile on ;tcp_nopush on ; keepalive_timeout 60 ;tcp_nodelay on ; gzip on ;gzip_min_length 1k ;gzip_buffers 4 16k ;gzip_http_version 1 .1 ;gzip_comp_level 4 ; gzip_types text/plain application/x-javascript text/css application/xml;gzip_vary on ;client_max_body_size 10m ; client_body_buffer_size 128k ; proxy_connect_timeout 120 ; proxy_send_timeout 120 ; proxy_read_timeout 120 ; proxy_buffer_size 4k ; proxy_buffers 4 32k ; proxy_busy_buffers_size 64k ; large_client_header_buffers 4 4k ;client_header_buffer_size 4k ;open_file_cache max=102400 inactive=20s ;open_file_cache_valid 30s ;open_file_cache_min_uses 1 ;upstream tdt_wugk {server 127.0.0.1:8080 weight=1 max_fails=2 fail_timeout=30s ;server 127.0.0.1:8081 weight=1 max_fails=2 fail_timeout=30s ;server {listen 80 ;server_name www.wuguangke.cn;access_log logs/access.log main;root /data/webapps/wugk; index index.php index.html index.htm; location ~ / {root /data/www/wugk; index index.php index.html index.htm; proxy_next_upstream http_502 http_504 error timeout invalid_header;proxy_redirect off ;proxy_set_header Host $host;proxy_set_header X-Real-IP $remote_addr;proxy_set_header X-Forwarded-For $proxy_add_x_forwarded_for;proxy_pass http://tdt_wugk; location ~ .*\.(html|htm|gif|jpg|jpeg|bmp|png|ico|txt|js|css)$ root /data/www/wugk;expires 30d ;location ~ \.php$ {root /root;fastcgi_pass 127.0.0.1:9000 ;fastcgi_index index.php;fastcgi_param SCRIPT_FILENAME /data/www/wugk$fastcgi_script_name;include fastcgi_params;location /NginxStatus {stub_status on ;
四.nginx常用命令 nginx -v #查看版本号
nginx -V #查看版本号以及安装时安装的模块
nginx -s reload | stop 重新载入配置文件|停止nginx
nginx -t 检查配置文件语法是否正确
nginx 直接输入命令表示启动nginx进程
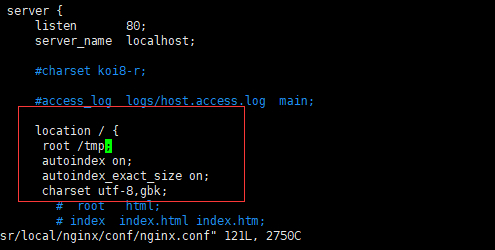
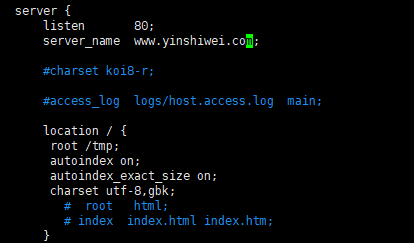
五.nginx常用模块功能 1.nginx目录索引 目录索引模块:ngx_http_autoindex_module
默认:编译进内核
编译参数:--without-http_autoindex_module
1 2 3 4 5 6 7 8 9 10 autoindex on ;location 里面即可实现目录索引浏览(autoindex也可加在http,server 里面,但一般不这么用)Syntax:autoindex on |off ;default : autoindex off ;server location 常用参数off ;on ,显示出文件的确切大小,单位为bytesoff ,显示文件的大概大小,单位为kb or MB or GBautoindex_localtime on ;off ,显示的文件时间为GMT时间on ,显示的文件时间为文件的服务器时间charset utf-8 ,gbk;
示例:
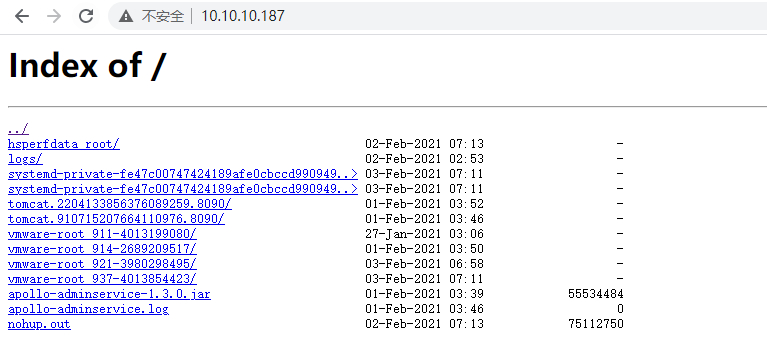
nginx -s reload #重载配置文件
访问:
2.nginx状态监控 状态监控模块:ngx_http_stub_status_module
默认:不编译进内核
编译参数:--with-http_stub_status_module
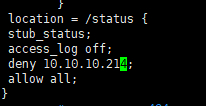
配置实例
1 2 3 4 5 location = /status {
访问:
因安全缘由,建议status状态页面仅内网开放访问或限制访问ip访问认证限制。
3.nginx访问控制 基于IP的访问控制模块: http_access_module 默认:编译进内核 编译参数:--without-http_access_module--without-http_auth_basic_module
IP: 1 2 3 4 5 6 7 8 允许:CIDR |unix: |all ;Default :-server ,location ,limit_exceptCIDR |unix: |all ;server , location , limit_exceptdefault : -
示例
本机访问(本机ip为10.10.10.214)
已被拒绝,其他同网端服务器访问没问题。
登录认证访问: 1 2 3 4 5 6 7 8 9 10 syntax: auth_basic string|off;default: auth_basic off;Context: syntax: auth_basic_user_file file;Default: -Context:
yum -y install httpd-tools (安装http工具包)
前面是用户后面是密码,生产用户密码文件
示例:
4.访问限制 经常会遇到这种情况,服务器流量异常,负载过大等等。对于大流量恶意的攻击访问,会带来带宽的浪费,服务器压力,影响业务,往往考虑对同一个IP的连接数,并发数进行限制。
限制连接数:ngx_http_limit_req_module
限制请求频率:ngx_http_limit_conn_module
默认:编译进内核
编译参数:--without-http_limit_conn_module
limit_req_zone 用来限制单位时间内的请求数,即速率限制,采用的漏桶算法 “leaky bucket”
limit_conn_zone 用来限制同一时间连接数,即并发限制
limit_conn_zone: 1 2 3 4 5 6 7 8 9 10 11 12 13 14 15 16 17 18 19 20 21 句法: limit_conn_zone key zone=name:size;$binary_remote_addr zone=addr:10m;$binary_remote_addr zone=perip:10m;$server_name zone=perserver:10m;
当且仅当limit_conn当前级别上未定义任何指令时,这些指令才从先前的配置级别继承。
1 2 3 4 句法: limit_conn_dry_run on | off ;off ;server ,location
启用空运行模式。在这种模式下,连接数不受限制,但是,在共享内存区域中,过多连接的数将照常计算。
1 2 3 4 句法: limit_conn_log_level info | notice | warn | error;server ,location
为服务器限制连接数的情况设置所需的日志记录级别。
1 2 3 4 句法: limit_conn_status code503
设置状态代码以响应被拒绝的请求而返回。
limit_req_zone: 1 2 3 4 5 6 7 8 9 10 11 12 13 14 15 16 17 18 19 句法: limit_req_zone key zone=name:size rate=rate [sync];$binary_remote_addr zone=one:10m rate=1r/s;
http{
1 2 3 4 句法: limit_req_dry_run on | off ;off ;server ,location
启用空运行模式。在这种模式下,请求处理速率不受限制,但是,在共享内存区域中,过多请求的数量将照常计算。
1 2 3 4 句法: limit_req_log_level info | notice | warn | error;server ,location
在服务器由于速率超出而拒绝处理请求或延迟请求处理的情况下,设置所需的日志记录级别。延迟的记录级别比拒绝的记录级别少1分;例如,如果limit_req_log_level notice指定“ ” ,则将延迟记录为该info级别。
1 2 3 4 句法: limit_req_status code503
设置状态代码以响应被拒绝的请求而返回。
1 2 3 4 5 $server_name 表示服务器的变量$binary_remote_addr 变量长度是固定的4字节$remote_addr 变量长度是7-15字节
5.日志模块 日志模块:
默认:编译进内核(在官方文档的编译模块中,没有日志模块的编译或不编译进内核的选项)
1 2 3 4 5 6 7 8 9 10 Syntax: log_format name [escape=default |json|none ] string ...;Default :"..." ;format [buffer=size ] [gzip[=level]] [flush =time] [if =condition]];Default :access .log combined;if in location, limit_except
配置示例:
1 2 3 4 5 log_format main '$remote_addr - $remote_user [$time_local ] "$request " ' '$status $body_bytes_sent "$http_referer " ' '"$http_user_agent " "$http_x_forwarded_for "' ;
log_format是定义的日志格式,access_log是存放的位置。main为日志的名称,下面通过这个main来进行调用
log_format 后面首先定义日志名称,然后’’中间代表日志显示格式,调用的是nginx变量,例如$remote_addr是客户端ip地址 , remote_user是客户端用户,下面是日志实际显示示例:
nginx常见内置变量:
1 2 3 4 5 6 7 8 9 10 11 12 13 14 15 16 17 18 19 20 21 22 23 24 25 26 27 28 29 30 31 32 33 34 35 36 37 38 39 40 41 42 43 44 45 46 47 48 49 50 51 52 53 54 55 56 57 58 59 60 61 62 63 64 65 66 67 68 69 70 71 72 73 74 75 76 77 78 79 80 81 82 83 84 85 86 87 88 89 90 91 92 93 94 95 96 97 98 99 100 101 102 103 104 105 106 107 108 109 110 111 112 113 114 115 116 117 118 119 120 121 122 123 124 125 126 127 128 129 130 131 132 133 134 135 136 137 138 139 140 141 142 143 144 145 146 147 148 149 150 151 152 153 154 155 156 157 158 159 160 161 162 163 164 165 166 167 嵌入式变量$ http_user_agent,$ http_cookie等。另外还有其他变量:$arg _name$args $binary _remote_addr4 个字节,对于IPv6地址,值的长度始终为16 个字节$body _bytes_sent$bytes _sent1.3 .8 、1.2 .5 )$connection 1.3 .8 、1.2 .5 )$connection _requests1.3 .8 、1.2 .5 )$content _length$content _type$cookie _name$document _root$document _uri$ uri$host $hostname $http _name$https $is _args$limit _rate$msec 1.3 .9 ,1.2 .6 )$nginx _version$pid $pipe 1.3 .12 ,1.2 .7 )$proxy _protocol_addr1.5 .12 )的客户端地址$proxy _protocol_port1.11 .0 )中的客户端端口$proxy _protocol_server_addr1.17 .6 )$proxy _protocol_server_port1.17 .6 )$query _string$ args$realpath _root$remote _addr$remote _port$remote _user$request $request _body$request _body_file$request _completion$request _filenamealias 指令以及请求URI 的当前请求的文件路径$request _id16 个随机字节生成的唯一请求标识符,以十六进制(1.11 .0 )$request _length1.3 .12 ,1.2 .7 )$request _method$request _time1.3 .9 、1.2 .6 );从客户端读取第一个字节以来经过的时间$request _uri$scheme $sent _http_name$sent _trailer_name1.13 .2 );变量名称的最后一部分是字段名称,该字段名称已转换为小写,并用短划线代替了下划线$server _addr$server _name$server _port$server _protocol1.0 ”,“ HTTP/1.1 ”或“ HTTP / 2.0 ”$status 1.3 .2 、1.2 .2 )$tcpinfo _rtt, $tcpinfo_rttvar, $tcpinfo_snd_cwnd, $tcpinfo_rcv_space$time _iso86018601 标准格式(1.3 .12 ,1.2 .7 )的本地时间$time _local1.3 .12 ,1.2 .7 )$uri $uri 在请求处理期间,例如在进行内部重定向或使用索引文件时, 的值可能会更改。
更多变量:https://nginx.org/en/docs/http/ngx_http_core_module.html#var_status
error_log(核心模块):
1 2 3 4 Syntax : error_log file [level];error .log error ;
6.虚拟站点 所属模块:ngx_http_core_module(server和location都属于该模块)
1 2 3 4 5 6 7 8 9 10 11 12 13 14 15 Syntax: server { ... }"" ;bind ] [ipv6only=on|off] [reuseport] [so_keepalive=on|off|[keepidle]:[keepintvl]:[keepcnt]];bind ] [ipv6only=on|off] [reuseport] [so_keepalive=on|off|[keepidle]:[keepintvl]:[keepcnt]];bind ] [so_keepalive=on|off|[keepidle]:[keepintvl]:[keepcnt]];
一个server表示一个虚拟主机,一个服务器可能有多个虚拟主机(多个网站),实现虚拟主机的方式有三种:
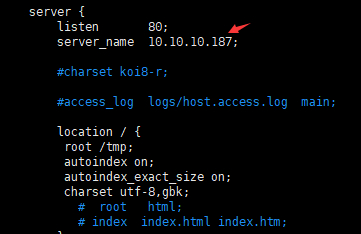
基于IP:
每个server监听不同的IP地址,用server_name来指定(域名和IP都是通过server_name指定)
基于域名:
需要注意的是基于域名的虚拟主机首先需要通过DNS能解析到,所以要么是已经购买的域名并且配置解析到该服务器的IP上,要么是本地内部DNS配置以后整个内网可以访问到。需要基于DNS解析。但这里是测试,所以把解析放在 /etc/hosts文件即可(linux在解析主机名时会优先去查看hosts文件是否有解析条目)。域名相较于IP和端口的优点是只需要一个端口和一个ip地址即可用于多个虚拟主机,但需要多个域名以区分访问地址。
基于端口:
修改listen后的数字即可,默认是80,如果是https的话需要监听443且拥有证书。改为非80(443)端口后再浏览器访问时需主动输入端口号,不然浏览器默认会访问80端口。
7. location 1 2 3 4 Syntax: location [ = | ~ | ~* | ^~ ] uri { ... }
location一般放置与server里面,一个server可以有多个location,location是用于匹配访问地址的uri
1 2 3 4 = 精确匹配。如果这个查询匹配,那么将停止搜索并立即处理此请求。
location匹配优先级:
1 ```(location `=` ) > (location `完整路径` ) > (location `^~` 路径) > (location `~`,`~*` 从上向下正则顺序,匹配在最后一条终止) > (location 部分起始路径) > (`/`)
例子:
1 2 3 4 5 6 7 8 9 10 11 12 13 14 15 16 17 18 19 20 21 22 23 24 25 location = / {
locaiton定义以后还需要将其匹配到linux服务器上对应的文件,就需要用到两个配置参数,root和index
1 2 3 4 5 6 7 8 9 Syntax: root path;Default :if in locationModule ngx_http_index_module:(INDEX 非core模块,而是单独模块)index file ...;Default :index index .html;
root是定义其的路径,如root /tmp 放在/的location里面则,当访问路径为根时,会访问到/tmp目录,但是到具体的访问文件时,是由index定义的,一般index定义为index.html或index.htm,如为.php会涉及到fastcgi协议,因为nginx本身只能处理静态html文件。
8.rewrite 所属模块:Module ngx_http_rewrite_module
默认:编译进模块 编译参数:--without-http_rewrite_module
1 2 3 4 5 6 7 8 9 10 11 12 13 14 15 Syntax: rewrite regex replacement [flag];if break : 本条规则匹配完成即终止,不再匹配后面的任何规则(不常用)。
例:
1 2 3 rewrite ^(/download/ .*)/media/ (.*)\..*$ $1 /mp3/ $2 .mp3 break ;/download/ .*)/audio/ (.*)\..*$ $1 /mp3/ $2 .ra break ;/(.*) http:/ /www.test.com/ $1 permanent;
服务器如需看rewrite日志需要做以下配置:
1.设置nginx的错误日志级别为notice
if: 1 2 3 Syntax: if (condition) { ... }
指定的condition被评估。如果为true,则执行括号内指定的此模块伪指令,并在伪指令内为请求分配配置 if。if指令中的配置是从先前的配置级别继承的。
条件可以是以下任意一种:
变量名;如果变量的值为空字符串或“
”,则为false;否则为false 。
在1.0.1版之前,任何以“ 0”开头的字符串都被视为错误值。
使用“ =”和“ !=”运算符将变量与字符串进行比较;
使用“ ~”(区分大小写的匹配)和“ ~*”(区分大小写的匹配)运算符将变量与正则表达式进行匹配。正则表达式可以包含捕获,这些捕获可用于以后在$1..$9变量中重用。负运算符“ !~”和“ !~*”也可用。如果正则表达式包含“ }”或“ ;”字符,则整个表达式应用单引号或双引号引起来。
使用“ -f”和“ !-f”运算符检查文件是否存在;
使用“ -d”和“ !-d”运算符检查目录是否存在;
使用“ -e”和“ !-e”运算符检查文件,目录或符号链接是否存在;
使用“ -x”和“ !-x”运算符检查可执行文件。
例子:
1 2 3 4 5 6 7 8 9 10 11 12 13 14 15 16 17 18 19 20 21 22 23 24 25 26 27 28 29 30 31 32 33 34 35 36 37 38 39 40 41 42 43 44 45 46 47 48 49 50 51 52 53 54 55 56 57 58 59 60 61 62 63 64 65 66 67 68 69 70 71 72 73 74 75 #如果UA包含"MSIE" ,rewrite请求到/msid/目录下if ($http_user_agent ~ MSIE) {$1 break ;$id 等于正则引用部分if ($http_cookie ~* "id=([^;]+)(?:;|$)" ) {set $id $1 ;POST ,则返回状态405(Method not allowed)。return 不能返回301,302if ($request_method = POST ) {return 405;$slow 可以通过 set 指令设置if ($slow ) {break 也是停止rewrite检查if (!-f $request_filename ){break ;query string中包含"post=140" ,永久重定向到example.comif ($args ~ post =140){if ($invalid_referer ) {return 404;
if可使用的全局变量:
1 2 3 4 5 6 7 8 9 10 11 12 13 14 15 16 17 18 19 20 21 22 23 24 25 26 27 28 29 30 31 32 33 34 35 36 37 38 39 40 41 42 43 44 45 46 47 48 49 50 51 52 53 54 55 56 57 58 59 60 61 62 63 64 65 66 67 68 69 70 71 72 73 74 75 76 77 78 79 80 81 82 83 84 85 86 87 变量名称$args $query_string $content_length $content_type $document_root $host $http_user_agent $http_cookie $limit_rate $request_method $remote_addr $remote_port $remote_user $request_filename alias 指令与URI请求生成$scheme $server_protocol $server_addr $server_name $server_port $request_uri $uri $uri 不包含主机名,如”/foo/bar.html”$document_uri $uri 相同
9.proxy模块 所属模块:ngx_http_proxy_module
默认:编译进模块 编译参数:--without-http_proxy_module
1 2 3 4 5 6 7 8 9 句法: proxy_pass URL;if in location,limit_except$proxy_host ;
proxy: proxy_pass和proxy_set_header是proxy模块中最常用到的两个功能
proxy_pass例子:
proxy_pass http:// localhost:8000 / uri /;
proxy_pass http://unix/tmp/backend.socket/uri/;
一般放在location下面,当location匹配到对应的uri之后,如果下面是proxy_pass而不是root,就会通过nginx去反向代理到proxy_pass指定的地址上面去请求访问。
反代的地址可以是ip地址,域名,sock文件地址,也可以是upstream指定的名称。
这个upstream是nginx的另一个模块叫做:ngx_http_upstream_module
ngx_http_upstream_module upstream最重要的功能是定义一组后端服务器,然后proxy_pass可以根据upstream定义好的直接调用,完成以后proxy_pass收到请求会将反向代理到upstream所定义的一组服务器上。
1 2 3 Syntax: upstream name { ... }
例子:
1 2 3 4 5 6 7 8 9 10 11 12 13 14 upstream backend {server backend1.example.com weight=5 ;server backend2.example.com:8080 ;server unix:/tmp/backend3;server backup1.example.com:8080 backup;server backup2.example.com:8080 backup;server {location / {proxy_pass http://backend;
upstream定义了一组后端服务器后,当然也会有调度方式:
1.如不进行任何配置,默认的调度方式为轮训调度。
2.weight:设置后端服务器的权重,权重大的优先访问
server 192.168.0.15 weight=10;
3.ip_hash:每个请求按访问ip的hash结果分配,这样每个访客固定访问一个后端服务器,可以解决session的问题
upstream backend {
4.fair(第三方)
upstream backend {
fair;
server 192.168.0.14:88;}
5.url_hash(第三方)
6.least_conn:
最少连接数,那个机器连接数少就分发(lc)
1 2 3 4 5 6 7 8 9 10 11 12 13 14 upstream backend {hash $request_uri ;
常用参数:down ,backup,fail_timeout=time,max_fails=number,wight,max_conns=number
这几个的参数的作用是向后端转发的时候添加头信息;
1 2 3 proxy_set_header Host $host :$server_port ;$remote_addr ;$proxy_add_x_forwarded_for ;
本文要说明nginx中的Host、X-Real-IP、X-Forwarded-For。
先看一个配置示例:
1 2 3 4 5 6 7 8 9 10 11 12 13 14 15 16 17 18 19 20 21 22 23 24 25 server {
客户端地址(请求服务的地址):192.168.1.1
nignx服务器地址:192.168.1.2
后端服务器地址:192.168.1.3
首先说明proxy_set_header是用来设置请求头的,设置了请求头后,后端服务器就可以获取到这些变量值。
一、X-Real-IP
是指客户端的真实IP,如果设置了$remote_addr这个值,后端服务器就能获取到客户端的真实IP,也就是此例中的192.168.1.1
二、Host
host的值设置为$proxyhost, 是指proxy_pass中设置的host值,也就是192.168.1.3,也就是服务器的IP地址。
若客户端发过来的请求header中有HOST这个字段,$http_host和$host表示的就是原始请求host,比如请求的时候HOST的值是http://test.com ,那么反代后还是http://test.com 。
若客户端发过来的请求header中没有HOST这个字段,$host表示nginx代理服务器的地址,也就是此例中的192.168.1.2。
$httphost不是一个固定的变量,他其实是$http _HEADER通配后的结果,这里的HEADER是一个通配符,通配的是请求头里的header属性,例如$http_content_type表示请求头里content-type属性的值,同理,$http_host指的就是请求头里的host属性。
三、X-Forwarded-For
这个变量的值有$proxy_add_x_forwarded_for和$remote_addr,在只有一个代理服务器的转发的情况下,两者的效果貌似差不多,都可以真实的显示出客户端原始ip。
举例说明,用户A的IP是192.168.1.1,请求一个经过两次nginx转发的应用,在第一台nginx中(192.168.1.2),配置如下:
1 proxy_set_header X-Forwarded-For $proxy_add_x_forwarded_for;
现在$proxy_add_x_forwarded_for变量的”X-Forwarded-For”部分是空的,所以只有$remote_addr,而$remote_addr的值是用户的ip,那么X-Forwarded-For变量的值就是用户的ip:192.168.1.1。
到第二台nginx,配置如下:
1 proxy_set_header X-Forwarded-For $proxy_add_x_forwarded_for;
现在的$proxy_add_x_forwarded_for变量,X-Forwarded-For部分包含的是用户的真实ip,$remote_addr部分的值是上一台nginx的ip地址,那么X-Forwarded-For的值就变成了”用户的真实ip,第一台nginx的ip”,也就是“192.168.1.1, 192.168.1.2”
所以还是建议X-Forwarded-For的值设置成$proxy_add_x_forwarded_for。
nginx正向代理: 示例配置:
1 2 3 4 5 6 listen 80;
其中重要的配置主要是:proxy_pass和 resolver
proxy指定其正向代理所转发的地址 $http_host为其url
$request_uri为其请求的uri
resolver后面跟的是其转发时使用的dns地址,如没指定,nginx无法正常解析dns,则无法访问域名网站。
10.四层负载均衡 proxy模块默认只支持七层代理,也就是基于http协议代理,如果想要进行四层转发的话(也就是对其他协议进行转发),可以用到stream模块:
所属模块:ngx_stream_core_module
默认:该ngx_stream_core_module模块自1.9.0版开始可用。默认情况下未构建此模块,应使用--with-stream 配置参数启用它 。使用官方源默认会编译该模块
1 2 3 Syntax: stream { ... }Default: —Context: main
在配置文件里面,其模块位置于http同级,下面是示例
1 2 3 4 5 6 7 8 9 10 11 12 13 14 15 16 17 18 19 20 21 22 23 24 25 26 27 28 29 30 31 32 33 34 35 36 37 38 39 40 worker_processes auto;error_log /var/log/nginx/error.log info ;events {worker_connections 1024 ;stream {upstream backend {hash $remote_addr consistent;server backend1.example.com:12345 weight=5 ;server 127.0.0.1:12345 max_fails=3 fail_timeout=30s ;server unix:/tmp/backend3;upstream dns {server 192.168.0.1:53535 ;server dns.example.com:53 ;server {listen 12345 ;proxy_connect_timeout 1s ;proxy_timeout 3s ;proxy_pass backend;server {listen 127.0.0.1:53 udp reuseport;proxy_timeout 20s ;proxy_pass dns;server {listen [::1 ]:12345 ;proxy_pass unix:/tmp/stream.socket;
这里于七层代理在配置文件上最大的区别就是http换成了stream
下面是我在本地做的一个实例:
效果为将一台服务器的ssh协议转发到后端两台服务器
调度器:10.10.10.105
后端服务器:10.10.10.187 ,10.10.10.243
调度服务器nginx 配置添加如下
stream {
三台服务器都是虚拟机,添加好配置以后使用xshell进行测试
在弹出的对话框输入账号密码,然后测试成功!
需要注意的是经过测试,stream模块是转发请求而非代理,严格意义上来说是四层转发,其功能于lvs无异。
11.HTTPS
https在http中加入TLS/SSL层,http为明文传输,而https为密文传输,也更为安全。https默认监听端口443,需要证书进行认证,一般证书都有第三方机构或CA颁发。
所属模块:http_ssl_module
默认:不编译进内核 编译参数:–with-http_ssl_module
1 2 3 4 5 6 7 8 9 10 11 syntax: ssl on | off;
nginx.conf配置:
1 2 3 4 5 6 7 8 9 10 11 12 13 14 15 16 17 server {
其中ssl_certificate为证书文件,ssl_certificate_key为秘钥文件。
在公司内部使用时,也可使用私有证书(公网中无法验证证书)。
私有证书颁发步骤:
1.生成key秘钥
要求:
2.nginx必须有ssl模块
1 2 3 4 5 6 7 8 9 10 11 12 13 14 15 16 17 18 19 20 21 22 23 24 25 26 生成RSA密钥(过程需要设置一个密码,记住这个密码)in domain.key -out domain_nopass.key"common name" ,需要与网站域名相同.for domain.key: 's hostname) []:domain.com # 网站域名 Email Address []:123@domain.com # 邮箱 A challenge password []: # 私钥保护密码,可直接回车 An optional company name []: # 一个可选公司名称,可直接回车 输入完这些就会生成一个domain.csr文件,提交给ssl提供商的时候就是这个csr文件.当然这里并没有向任何证书提供商申请,而是自己签发证书. 使用上面的密钥和CSR对证书签名 openssl x509 -req -days 365 -in domain.csr -signkey domain.key -out domain.crt 最后将crt文件与key文件放入nginx配置文件中去
